
Learn how to use the best-in-class BitBox02 multisignature for Electrum multisig wallets. The integrity of the whole multisig setup, including all co-signers, will be secured by the BitBox02 hardware wallet. We wrote this post for advanced users, so we’ll go a bit more into details.
Part 1: Use BitBox02 with Electrum wallet
Part 2: Advanced Electrum features
Part 3: BitBox02 multisignature wallet
Electrum
The free open-source Electrum wallet is a powerful Bitcoin light client for Windows, Mac and Linux. It connects to an Electrum server of your choice and offers many advanced features. It can be used as a pure software wallet, with the private keys stored on your computer, but it also works very well with most hardware wallets.
Note: Electrum wallet is a third-party application. We don’t have control over the development and distribution of the software and can’t provide any guarantees. The BitBox02, however, keeps your private keys safe at all times.
What is a multisignature wallet?
A multisignature Bitcoin wallet can be viewed as a shared account that needs multiple authorizations to spend money. The shared control is achieved by using more than one private key. The number of keys that need to sign a transaction (M), and the total number of keys (N) are defined when creating the wallet. The wallet is then typically referred to as a M-of-N multisig wallet, for example a “2-of-3 multisig wallet” where 2 keys out of a total of 3 need to sign each transaction.
Multisignature wallets have various applications:
- Distribute responsibility: different people are controlling one key each, and every transaction needs to be signed by a predefined number of keys.
- Added security: one person controls all keys, but these are created on different computers or hardware wallets, avoiding a single point-of-failure.
- Added resilience: Multiple keys stored in different locations make the wallet more resilient against theft (e.g. one stolen key is not enough) and data loss (funds are still recoverable with a lost key).
Unfortunately, keys cannot simply be rotated, so with each change in signing keys (e.g. because an employee left the company, or a key has been compromised) a new wallet needs to be created, to which all funds are then transferred.
What are potential pitfalls?
Creating a multisignature wallet sounds like an easy enough solution, and is often advised. But due to more moving parts, such setups are complex and contain pitfalls not immediately obvious. In combination with hardware wallets, multisig wallets are especially hard to use securely, as most hardware wallets are stateless and don’t remember the other co-signers. Without that knowledge, it’s hard to independently verify receiving addresses or outgoing transactions.
Backup of multisig setups
Each participant in a multisignature setup must not only secure their private keys or seed, but also additional metadata like the extended public keys (xpub) of all co-signers, the used threshold, derivation path and script type.
Why is that? Even though a multisignature setup, for example a 2-of-3 multisig wallet, sounds like it could be recovered with two keys, it cannot. Funds are locked with the hash of all extended public keys and the threshold, so you need all of them to restore the wallet, and then the required amount of private keys to spend the funds.
Receiving funds
When creating and validating a new receiving address, your hardware wallet needs to let you independently verify the address and make sure that all co-signer parameters — like their xpub, total number and signing threshold — are correct. Otherwise, malware on your computer could trick you into receiving funds into a different wallet (partially) controlled by an attacker, for example by swapping out two co-signers in a 2-of-3 multisig wallet.
Spending funds
The tricky part for hardware wallets in signing multisig transactions is not the signature itself, but verifying that the change address is under sole control of the expected multisignature setup. This again depends on the knowledge of all xpubs of the co-signers.
Read more about this in our dedicated blog post The pitfalls of multisig when using hardware wallets.
How to do multisig properly?
The BitBox02 solves all these potential issues in the most thorough way: it lets you store the checksum of all relevant information about your co-signers directly in the hardware wallet. This enables the BitBox02 to automatically verify sending and receiving operations, which is not possible with other hardware wallets, like Ledger or Trezor. The only tricky part remains the backup, that we explain in detail further down.
Prepare your BitBox02s
We will use three BitBox02 hardware wallets for our multisignature setup. This is the recommended option, as it works the smoothest and avoids unnecessary complexity that could potentially lead to decreased security.
A multi-signature setup with hardware wallets of different manufacturers is also very interesting, but adds a lot of complexity, since other vendors miss some verification features. We will demonstrate how to do that securely in a follow-up article, with the BitBox02 adding significant security to the overall setup thanks to its unique capability to keep the co-signers in check.
Before you can use the BitBox02 with Electrum, you need to set up the devices and update them to firmware 9.0.0 (or higher) with the BitBoxApp.
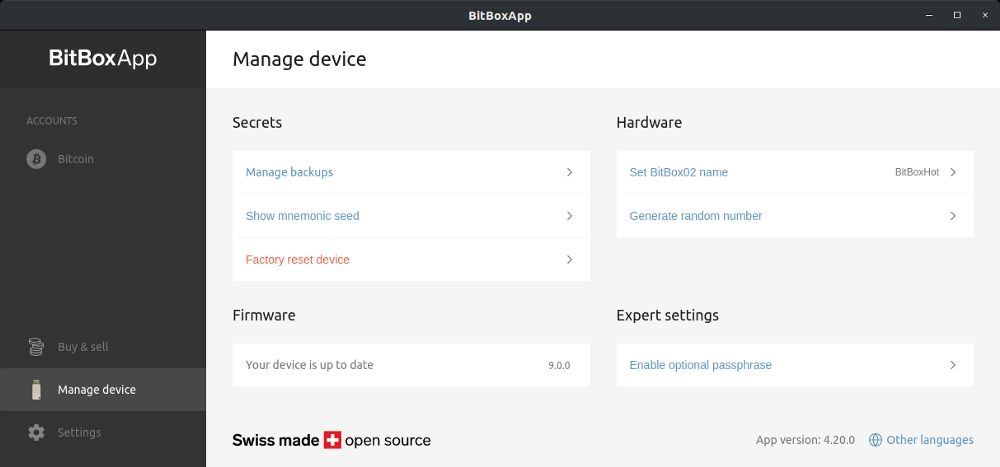
In this multisig setup you need to know when to connect which device. It’s helpful to give each BitBox02 a device name, and additionally label it using the numbered stickers that come with every device.
You can name and update your devices in the BitBoxApp under “Manage device”.
Create a BitBox02 multisig wallet in Electrum
Configure a multisig wallet
There are countless multisignature configurations possible (see the Bitcoin Wiki Multisignature page for some examples). For our first dive into multisig, we will create a 2-of-3 multisig wallet.
Make sure that the BitBoxApp is closed and then launch Electrum. Also check that there isn’t an Electrum wallet already using a BitBox02, as this would block the device when creating the new multisig wallet.
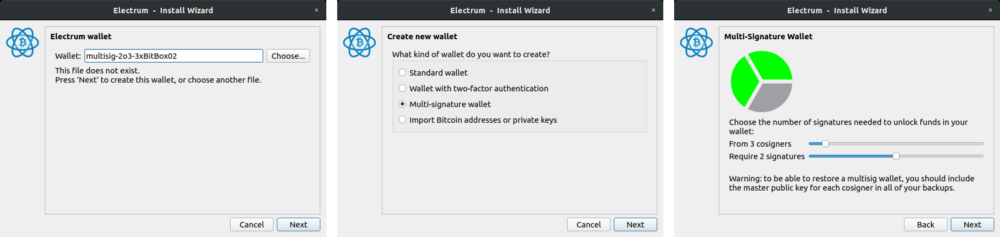
Create a new wallet via “File / New/Restore”, and give it a descriptive wallet name. Click “Next”.
Select “Multi-signature wallet” and click “Next”.
In this screen, you can configure the total number of co-signers and the required threshold. We’ll create a 2-of-3 multisig wallet.
Add the first BitBox02 as co-signer
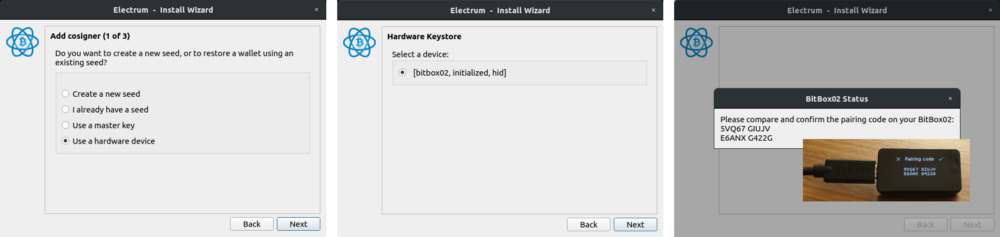
Now we need to register each co-signer individually. Connect the first BitBox02, choose screen orientation (“Tap this side”) so that “See the BitBoxApp” is displayed.
In Electrum, select “Use a hardware device” and click “Next”.
Electrum shows “[bitbox02, initialized, hid]”, click “Next”.
Unlock the BitBox02 by entering the device password directly on the hardware wallet.
If you never connected your BitBox02 to Electrum before, you’re asked to confirm the pairing code on the device. This makes sure that all future communication from Electrum over USB to the BitBox02 is encrypted.
Should you get the error message “No hardware device detected. To trigger a rescan, press ‘Next’.”, make sure that the BitBox02 is ready (either unlocked, or “See BitBoxApp” is displayed) and click “Next” to try again.
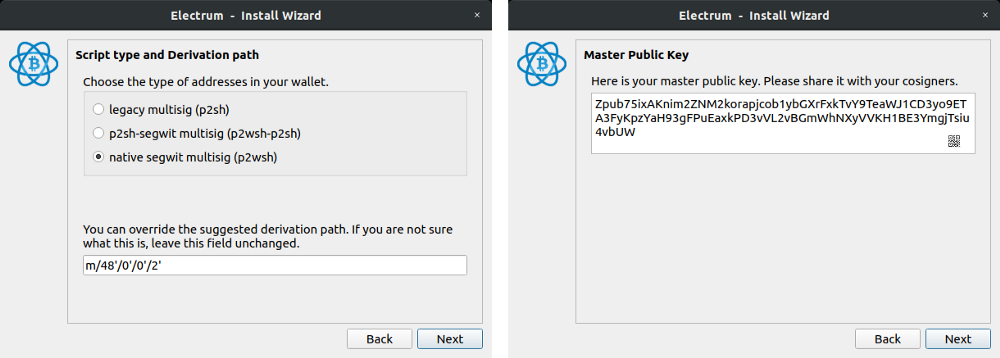
Now select “native segwit multisig (p2wsh)” and write down the derivation path, as it is not easy to display it again later. Click “Next”.
The extended public key of the first BitBox02 is shown. You don’t need to check it here, we’ll do it for all three devices in one go later on. Click “Next”.
You can now unplug the BitBox02.
Add more co-signers
Now you’ll need to add the other two BitBox02 as co-signers. Choose “Cosign with hardware device” and repeat the steps above, starting by connecting the next BitBox02.
Finishing up
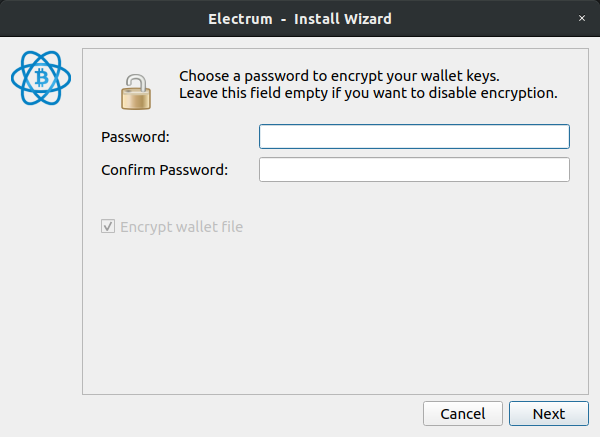
As a last step, Electrum offers the option to protect your wallet with a password. Although your wallet does not contain any secrets (the private keys never leave the BitBox02), it stores your addresses, transactions and the wallet balance. If you’d like to keep this information private, enter a password and click “Next”.
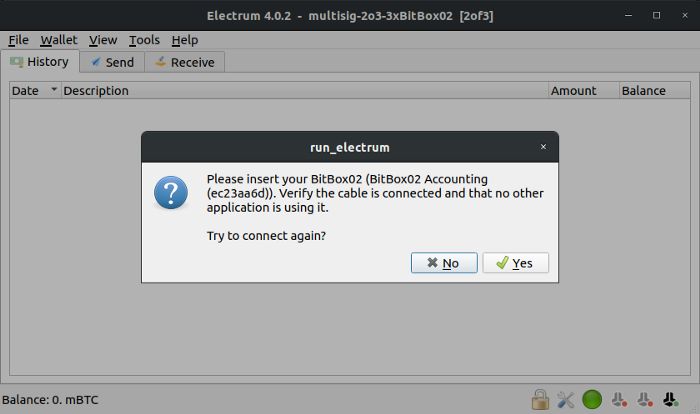
The multisig wallet is now ready. Unfortunately, the Electrum user interface is a bit wonky here. It will ask you to “Please insert your BitBox02” for all three BitBox02 devices, one after the other.
You don’t need to connect all devices all the time. Here’s how many BitBox02 you need to connect for different purposes:
- check past transactions and current balance
→ no BitBox02 needed - create a receiving address
→ one BitBox02 needed for secure verification - spend your bitcoin
→ M BitBox02 needed (depending on your M-of-N multisig wallet setup)
You can connect multiple devices at the same time, but you can also connect one after the other.
When prompted to “Please insert your BitBox02 (Device Name)”, you can
- click “Yes” to scan for that specific device and connect it, or
- click “No”, to skip this device.
You’re asked for each BitBox02, so you might need to click “No” until Electrum asks you for the right device. This is why it is important to give your BitBox02 devices easy to identify names.
For now, you can just click “No” twice.
For now, you can just click “No” twice.
Backup your multisig configuration
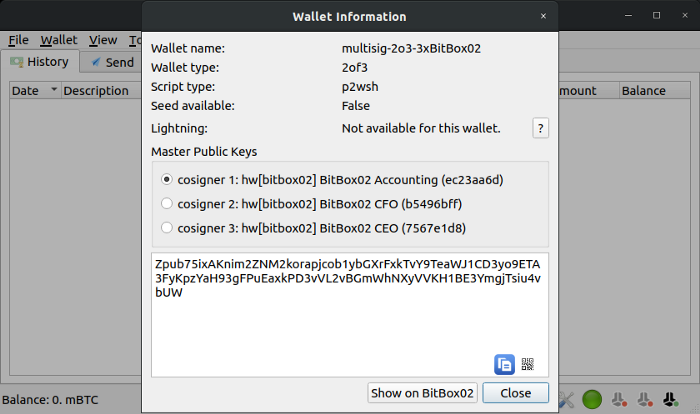
Now it’s important to back up the specifics of your multisig setup. Go to “Wallet / Information” and copy the following information into a text file. Also write down a short wallet name (30 characters max, “Wallet XYZ” in this example), that is later used to identify this setup on the BitBox02. This is privacy-sensitive information, but not secret.
BitBox secure multisig
------------------------------

Wallet name:      multisig-2o3–3xBitBox02
Wallet type:      2of3
Script type:      p2wsh
Derivation path:  m/48'/0'/0'/2'1)

BitBox02 Accounting
Zpub75ixAKnim2ZNM2korapjcob1ybGXrFxkTvY9TeaWJ1CD3ef9ETA3FyKpzYaH93g
FPuEaxkPD3vVL2vBGmWhNXyVVKH1BE3YmgjTsiu4vbUW2)

BitBox02 CFO
Zpub75xnEH4VSNBjmwC9xxNvwCdnZukBGJVcTL8fxYqi68w3YJ5zz4j1qh8u1dn41Ut
22rCTo6qxndNLSokThu6ossPHHrnJ5i267FNCZFRRsKX3)

BitBox02 CEO
Zpub75pZww3awB7w4QdNfVAYctVD4Qa76hfxxdmbkxt8GJuzM6KdWchbUSohUfTf2xv
2BKdDtavU2k222wTSkefKM7sidQeZ3X3PkUWnxrvWfkw
This backup information must then be stored with each backup of all hardware wallets, otherwise you might not be able to recover your funds if the devices are lost or damaged. You can just print this information as text or QR codes on paper as it does not contain any secrets. Make sure to verify the data on the printout in the next step, where it is shown on the BitBox02.
Register a multisig setup on the BitBox02
As outlined in the beginning, secure and automatic verification of receiving addresses is only possible if the hardware wallet knows the co-signers. This is why a new multisig setup is automatically registered with a specific name on the BitBox02 on first use, making it possible for you to verify all parameters.
To register your setup on the BitBox02, go to the tab “Receive”, and create a receiving address by clicking on “Request”. Verify the receiving address by clicking on the BitBox02 eye symbol (hover over it with the mouse pointer to find the right one).
You are then prompted to name the wallet.
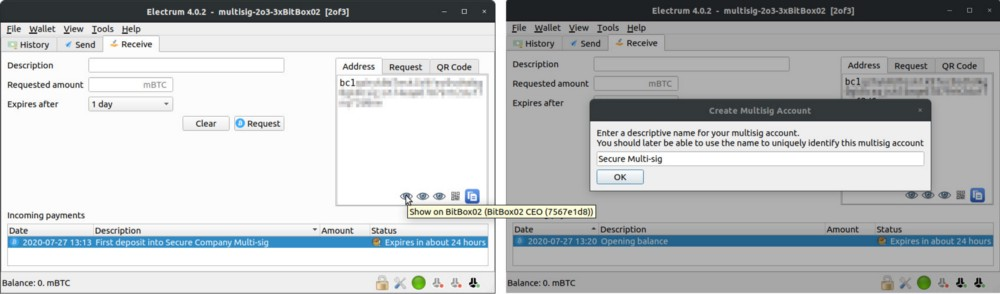
On the BitBox02, verify and confirm the displayed information against the text file you created earlier, including all xpubs. The BitBox02 clearly indicates which xpub corresponds to this specific device, and which belongs to the cosigners.

Immediately after the multisig account registration, the receive address is shown for verification, as explained in the next section.
Repeat this step for all BitBox02 to have the multisig account registered. After that, you can be sure that whenever you use any of the BitBox02 for this multisig account, the multisig setup did not change and you are spending and receiving to exactly this account.
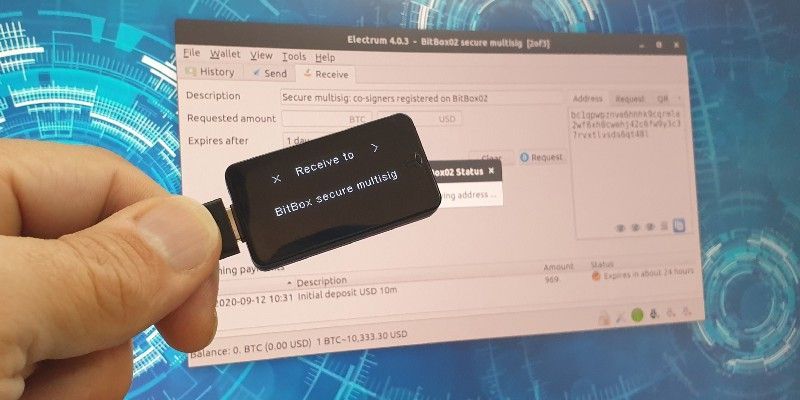
Receive funds
We’ve already created a new receiving address to trigger the multisig account registration. So immediately after confirming the multisig configuration, the “Receive to” screen is shown on the BitBox02.
Receiving addresses can be verified anytime by clicking on the BitBox02 eye icon in the Electrum interface (see above).
The BitBox02 recognizes the registered multisig account and displays the relevant details including the account name. This step already takes care of the verification of all co-signers, you don’t need to check any other information manually. This is only possible because the BitBox02 stores a checksum of all cosigner details directly on the device.

As the last step, verify the address on the BitBox02 by using the bottom slider and confirm if it matches.
Send funds
To send from this multisig wallet, you need to have two BitBox02 ready. Create a sending transaction as usual in Electrum, click on “Pay” and set your fee rate. If you hover over the slider with the mouse, you can see additional information like ETA and the rate in sat/vbyte. Then click “Send”.
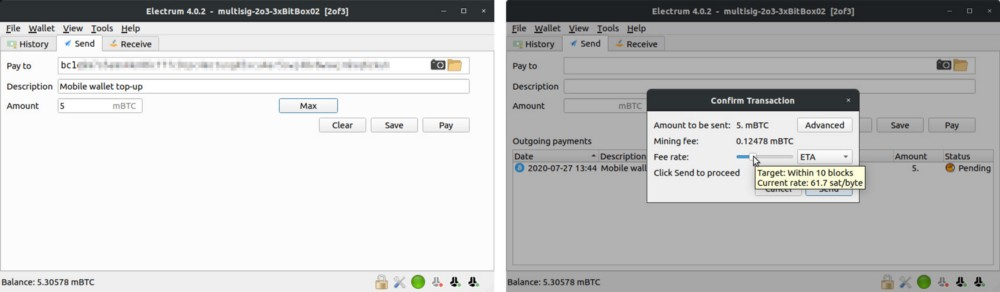
Connect the first BitBox02 and tap its side until it says “See BitBoxApp”. Now, the BitBox02 recognizes the previously registered multisig account and displays the relevant details including the name. Again, this step automatically verifies that all other co-signers match your original configuration and the change will be sent back to an address that is solely controlled by this multisig wallet.
Verify the transaction (receiving address, amount, fees) and sign it.

For the next signature, Electrum will ask you for each of the three BitBox02 in sequence. Let’s say we want to use the CEO’s BitBox02. Connect this BitBox02 and tap its side until it says “See BitBoxApp”. When asked for the “BitBox02 Accounting” click “No”, and then once asked for the “BitBox02 CEO” click “Yes”.
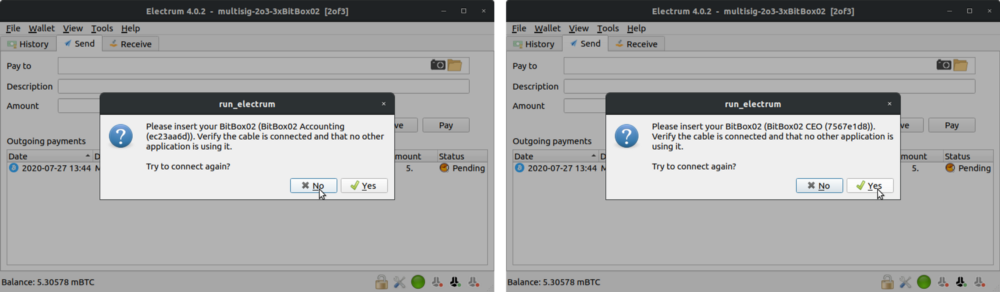
After verifying the transaction once more, sign it and it will be broadcasted.
BitBox02 ❤️ Electrum
This concludes our series of step-by-step guides on using the Electrum power-user wallet with the security of the BitBox02 hardware wallet.
BitBox02 is the perfect multisig solution
The BitBox02 can be used safely for multisig, since it stores additional necessary information, like the the extended public keys (xpub) of all co-signers. This gives you peace of mind when using multisig setups, even if you are not an advanced user.
Order you BitBox02 today. We ship worldwide!
Frequently Asked Questions (FAQ)
What is the BitBox02 multisignature wallet?
The BitBox02 multisignature wallet is a feature that allows users to set up multisignature wallets using the BitBox02 hardware wallet in conjunction with the Electrum wallet. This ensures the integrity of the entire multisig setup, including all co-signers.
What is a multisignature wallet?
A multisignature Bitcoin wallet is like a shared account that requires multiple authorizations to spend money. It uses more than one private key, and the number of keys required to sign a transaction and the total number of keys are defined when creating the wallet.
Why use multisignature wallets?
Multisignature wallets offer distributed responsibility, added security by avoiding a single point of failure, and increased resilience against theft and data loss. However, they also come with complexities, such as the inability to easily rotate keys.
What are the challenges of multisig setups?
Multisig setups, especially with hardware wallets, can be complex. Most hardware wallets are stateless and don't remember other co-signers, making it hard to verify addresses or transactions. Backups also require additional metadata like extended public keys and script types.
How does BitBox02 address multisig challenges?
BitBox02 allows users to store the checksum of all relevant information about co-signers directly in the hardware wallet. This enables the BitBox02 to automatically verify sending and receiving operations, a feature not available in other hardware wallets.
How do I back up my multisig configuration?
It's crucial to back up the specifics of your multisig setup. This includes information like the extended public keys of all co-signers, the used threshold, derivation path, and script type. This backup ensures fund recovery if devices are lost or damaged.
How do I register a multisig setup on the BitBox02?
To register a multisig setup on the BitBox02, go to the "Receive" tab in Electrum, create a receiving address, and verify the address using the BitBox02. This registers the multisig account and allows for secure and automatic verification of receiving addresses.
How do I send funds from a multisig wallet?
To send funds, create a transaction in Electrum, set your fee rate, and click "Send". Connect the required number of BitBox02 devices, verify the transaction, and sign it. The transaction will then be broadcasted.
How does BitBox02 enhance Electrum's capabilities?
BitBox02 complements Electrum by providing enhanced security for multisig setups. It stores additional necessary information, ensuring peace of mind when using multisig setups, even for non-advanced users.
Shift Crypto is a privately held company based in Zurich, Switzerland. Our international team of specialists across engineering, cryptosecurity and Bitcoin core development build the BitBox products and provide consulting services. The BitBox02, a second generation hardware wallet, equips individuals to easily store, protect, and transact cryptocurrencies. Its companion, the BitBoxApp, provides an all-in-one solution to securely manage your digital assets with ease.